In an existing Laravel app
On this page:
- Getting a license
- Installation via Composer
- Publish the config file
- Configure an email sending service
- Prepare the database
- Add the route macro
- Schedule the commands
- Publish the assets
- Take care of throttling
- Install Horizon
- Add authorization to Mailcoach UI
- Specifying a timezone
- Visit the UI
If you have experience with Laravel and/or PHP, and have a Laravel 8 application, you can install Mailcoach as a package inside it.
The package is called spatie/laravel-mailcoach Installing Mailcoach as a package offers great ways of customizing Mailcoach. Anything that can be done via the Mailcoach UI, can also be done via code.
You can tightly integrate Mailcoach into your application logic. You can listen for the various events that Mailcoach fires when mails are opened, clicked, … to execute custom logic. Mailcoach stores information in the database using regular Eloquent models, that can be used by your application code too.
Getting a license
In order to install Mailcoach, you’ll need to get a license first.
Installation via Composer
First, add the satis.spatie.be repository in your composer.json.
"repositories": [
    {
        "type": "composer",
        "url": "https://satis.spatie.be"
    }
],
Next, you need to create a file called auth.json and place it either next to the composer.json file in your project, or in the composer home directory. You can determine the composer home directory on *nix machines by using this command.
composer config --list --global | grep home
This is the content you should put in auth.json:
{
    "http-basic": {
        "satis.spatie.be": {
            "username": "<YOUR-SPATIE.BE-ACCOUNT-EMAIL-ADDRESS-HERE>",
            "password": "<YOUR-LICENSE-KEY-HERE>"
        }
    }
}
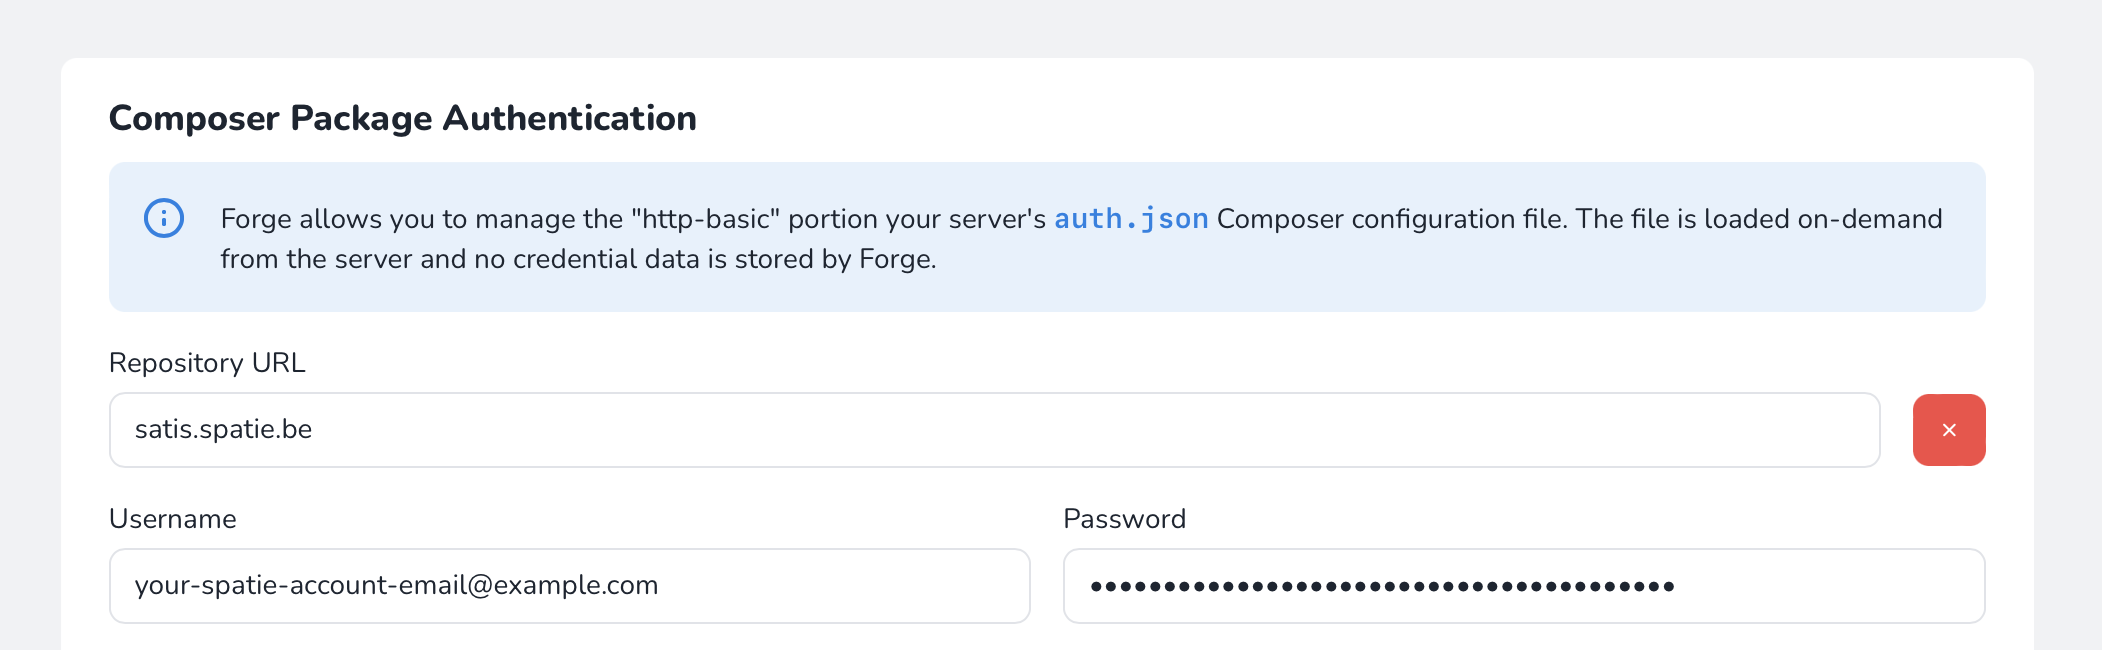
If you are using Laravel Forge, you don’t need to create the auth.json file manually. Instead, you can set the credentials on the Composer Package Authentication screen of your server. Fill out the fields with these values:
- Repository URL:
satis.spatie.be - Username: Fill this field with your spatie.be account email address
- Password: Fill this field with your Mailcoach license key
To validate if Composer can read your auth.json you can run this command:
composer config --list --global | grep satis.spatie.be
If you did everything correctly, the above command should display your credentials. If that command doesn’t display anything, verify that you created an auth.json as mentioned above.
With this configuration in place, you’ll be able to install the package into your project using this command:
composer require "spatie/laravel-mailcoach:^6.0"
Publish the config file
Optionally, You can publish the config file with this command.
php artisan vendor:publish --provider="Spatie\Mailcoach\MailcoachServiceProvider" --tag="mailcoach-config"
Check out the default contents of the config file here
Configure an email sending service
Mailcoach can send out mail via various email sending services and can handle the feedback (opens, clicks, bounces, complaints) those services give.
Head over to the Laravel documentation to learn how to set up a mailer.
Mailcoach can use different mailers for sending confirmation & welcome mails and campaign mails. This way you can keep very good reputations with the mailer service you use for campaign mails, as the confirmation mails might bounce.
To use different mailers, fill in the name of configured mailers in the campaigns.mailer and transactional.mailer of the mailcoach.php config file.
To configure tracking open, clicks, bounces & complaints, follow the instruction on the dedicated docs page of each supported service.
Prepare the database
You need to publish and run the migration:
php artisan vendor:publish --provider="Spatie\Mailcoach\MailcoachServiceProvider" --tag="mailcoach-migrations"
php artisan migrate
Add the route macro
You must register the routes needed to handle subscription confirmations, open, and click tracking. We recommend that you don’t put this in your routes file, but in the boot method of RouteServiceProvider
Route::mailcoach('mailcoach');
Schedule the commands
In the console kernel, you should schedule these commands.
Regarding the mailcoach:cleanup-processed-feedback command, be aware that email providers such as SES are a ‘deliver at least once’ service. Duplicate feedback delivery could be seen weeks after the event. Mailcoach prevents duplicates from SES by checking for old matching feedback. As such, cleaning up historical feedback webhooks could lead to duplicate feedbacks items being processed multiple times. The end result is inflated open and click metrics.
// in app/Console/Kernel.php
protected function schedule(Schedule $schedule)
{
    // ...
    $schedule->command('mailcoach:send-automation-mails')->everyMinute();
    $schedule->command('mailcoach:send-scheduled-campaigns')->everyMinute();
    $schedule->command('mailcoach:send-campaign-mails')->everyMinute();

    $schedule->command('mailcoach:run-automation-triggers')->everyMinute();
    $schedule->command('mailcoach:run-automation-actions')->everyMinute();

    $schedule->command('mailcoach:calculate-statistics')->everyMinute();
    $schedule->command('mailcoach:calculate-automation-mail-statistics')->everyMinute();
    $schedule->command('mailcoach:send-campaign-summary-mail')->hourly();
    $schedule->command('mailcoach:cleanup-processed-feedback')->hourly();
    $schedule->command('mailcoach:send-email-list-summary-mail')->mondays()->at('9:00');
    $schedule->command('mailcoach:delete-old-unconfirmed-subscribers')->daily();
}
Publish the assets
You must publish the JavaScript and CSS assets using this command:
php artisan vendor:publish --tag mailcoach-assets --force
To ensure that these assets get republished each time Mailcoach is updated, we highly recommend you add the following command to the post-update-cmd of the scripts section of your composer.json.
"scripts": {
    "post-update-cmd": [
        "@php artisan vendor:publish --tag mailcoach-assets --force"
    ]
}
Take care of throttling
It’s common for e-mail providers to limit the number of e-mails you can send within a given amount of time. You should look up the limits of the email sending provider that you will use, and specify the throttling limits in your mail configuration.
Install Horizon
This package handles various tasks in a queued way via Laravel Horizon. If your application doesn’t have Horizon installed yet, follow their installation instructions.
After Horizon is installed, don’t forget to set QUEUE_CONNECTION in your .env file to redis.
config/horizon.php should have been created in your project. In this config file, you must add a block named mailcoach-general and mailcoach-heavy to both the production and local environment.
'environments' => [
    'production' => [
        'supervisor-1' => [
            'connection' => 'redis',
            'queue' => ['default'],
            'balance' => 'simple',
            'processes' => 10,
            'tries' => 2,
            'timeout' => 60 * 60,
        ],
        'mailcoach-general' => [
            'connection' => 'mailcoach-redis',
            'queue' => ['mailcoach-schedule', 'mailcoach', 'mailcoach-feedback', 'send-mail', 'send-automation-mail'],
            'balance' => 'auto',
            'processes' => 10,
            'tries' => 2,
            'timeout' => 60 * 60,
        ],
        'mailcoach-heavy' => [
            'connection' => 'mailcoach-redis',
            'queue' => ['send-campaign'],
            'balance' => 'auto',
            'processes' => 3,
            'tries' => 1,
            'timeout' => 60 * 60,
        ],
    ],

    'local' => [
        'supervisor-1' => [
            'connection' => 'redis',
            'queue' => ['default'],
            'balance' => 'simple',
            'processes' => 10,
            'tries' => 2,
            'timeout' => 60 * 60,
        ],
        'mailcoach-general' => [
            'connection' => 'mailcoach-redis',
            'queue' => ['mailcoach-schedule', 'mailcoach', 'mailcoach-feedback', 'send-mail', 'send-automation-mail'],
            'balance' => 'auto',
            'processes' => 10,
            'tries' => 2,
            'timeout' => 60 * 60,
        ],
        'mailcoach-heavy' => [
            'connection' => 'mailcoach-redis',
            'queue' => ['send-campaign'],
            'balance' => 'auto',
            'processes' => 3,
            'tries' => 1,
            'timeout' => 60 * 60,
        ],
    ],
],
In the config/queue.php file you must add the mailcoach-redis connection:
'connections' => [

    // ...

    'mailcoach-redis' => [
        'driver' => 'redis',
        'connection' => 'default',
        'queue' => env('REDIS_QUEUE', 'default'),
        'retry_after' => 11 * 60,
        'block_for' => null,
    ],
Add authorization to Mailcoach UI
laravel-mailcoach does not come with any user management, we assume that you already provide this in your own app. You can use a gate check to determine who can access Mailcoach.
You can determine which users of your application are allowed to view the mailcoach UI by defining a gate check called viewMailcoach.
Here’s an example where we assume that administrators of your application have a admin attribute that is set to true. This gate definition will only allow administrators to use the Mailcoach UI.
// in a service provider

public function boot()
{
   \Illuminate\Support\Facades\Gate::define('viewMailcoach', function ($user = null) {
       return optional($user)->admin;
   });
}
Mailcoach will redirect unauthorized users to the route specified in the redirect_unauthorized_users_to_route key of the Mailcoach config file. By default, the login route is used. If you don’t have a login route in your application, set this setting to a route that does exist.
Specifying a timezone
By default, all dates in Mailcoach are in UTC. If you want to use another timezone, you can change the timezone setting in the config/app.php config file.
Visit the UI
After performing all these steps, you should be able to visit the Mailcoach UI at /mailcoach.
Before sending out a real campaign, we highly recommend creating a small email list with a couple of test email addresses and send a campaign to it. This way, you can verify that sending mails, and the open & click tracking are all working correctly.